Finalising

Well that's all the hard work done and dusted!
All that's left to do now is for me to group all of the characters together, create some fancy lighting and then it's all finished.

So here I simply imported all of the characters together and rendered them to see how they looked, I had to scale some of the characters so that they stuck to the size of their original design, for example the Small Robber had to be the smallest.

For the nice final image I created a floor and back drop, I applied a brick Diffuse and a normal map to the backdrop so that when the light hit it, it didn't look flat. As for the lights I used a standard white light infront of the characters and this was the only light to cast shadows, the other two lights do not.

One of the two light is to the left and shines a light blue light over the 'good' characters, while the other light shines a dark red over the 'bad' character. This also creates a lighting effect similar to police sirens. I am overall very pleased with how this image came out and also how this project went.

I have learnt much on this module from simple modelling techniques to fixing issues and creating many different maps for characters.


Normal Maps

So everything is finished exept my normal maps, as I said before I previously tried using xNormal but while it avoided some problems the end result didn't seem as, 'clean' as with Mudbox. So I used that.

DETECTIVE
First up, yet again, the Detective.
I had quiet a few issues at first with the normal maps but fortuantly an anoyying little tickbox was the culprit, unticking this box seemed to fix the cause for the problems such as artifacts and un-sync normals. I should also say that I used Subdivision to bake my normal maps, these could only be done one model at a time, for example the Detective's jacket, shirt, hands and shoes all had to be done seperatly, then in photoshop I simply merged them all together.
Below are the final Normal Maps for the Detective:
The Normal Map for the Detective's head

The Normal Map for the Detective's body

For me to pose this character I had to first rig is, this was done using a biped in 3ds Max. I only rigged this character quickly and focused mostly on the arms and legs, as they will be the only thing that really gets posed. When all of the maps have been applied and the character was posed this is what the render looked like. I am happy to see the character finished!


STRONG ROBBER
After changing the UVs for the Strong Robber I had no major issues with the normal maps below:

The Normal Map for the Strong Robber's head

The Normal Map for the Strong Robber's body

I rigged the Strong Robber, focusing on the arms and legs as only they needed to be posed, as well as the texture maps being applied this is how the model looked, I am very pleased with the outcome.


POLICE OFFICER
The Police Officer didn't need any drastic changed to it's UVs so after the few tweaks stated earlier
the Normal Maps came out quite nice:

The Normal Map for the Police Officer's head

The Normal Map for the Police Officer's body

I rigged the Police Officer basically so that he could be posed, and after all of the texture maps had been applied this is the result I got. I am also very pleased with the outcome of this character


SMALL ROBBER
The Small Robber also didn't have many issues, if any. The head UVs were fine and only the body needed some changes so again, the normal map process was fairly quick. Here are the results:

The Normal Map for the Small Robber's head

The Normal Map for the Small Robber's body
I rigged the model very basically so that the arms and legs could be posed, and after all of the maps had been applied this was the result I got, I'm happy with the end result


Texturing

Now that I have all of the characters modelled, unwrapped and sculpted via mudbox it's time for me to bake my ambient occlusion maps. AO maps will give me a nice shading effect in all the details such as clothing creases and skin pores, this will help the detail show when texturing my characters.

I at first used xNormal for my maps, however they didn't seem to get enough of the detail I required and left the low poly model looked rather blury. I then decided to try using mudbox again but I kept getting artifacts in my normal map test. I figured out the problem was with my UVs, I had placed mirrored UVs over eachother and so they was sharing the same space and needed their own. Another Issue I came across was when the default tickbox "Smooth Source Models" was on, unticking this resolved my issues. 


DETECTIVE
First off, I started with the Detective as always. I used the high poly model in mudbox to make my AO maps. The detective's issues were resolved by unticking the smooth source models so I didn't need to change the UVs for this character.

Once I had created the AO map, I took this into photoshop and applied simple colours for the Diffuse Map.

AO Map for the Detective's head.

Diffuse Map for the Detective's head that I created in photoshop.

AO Map for the Detective's body.

Diffuse Map for the Detective's body.


STRONG ROBBER
I had some issues with seams and for the head I managed to simple select some UVs and place give them their own space, as for the body however I didn't like how I did it the first time so I completely re-unwrapped it, this didn't take too long as at this point I've had plenty of practice.


The new UV Map for the Strong Robber's head

The AO for the Strong Robber's head

The Diffuse Map for the Strong Robber's head


The new UV Map for the Strong Robber's body

The AO for the Strong Robber's body

The Diffuse Map for the Strong Robber's body
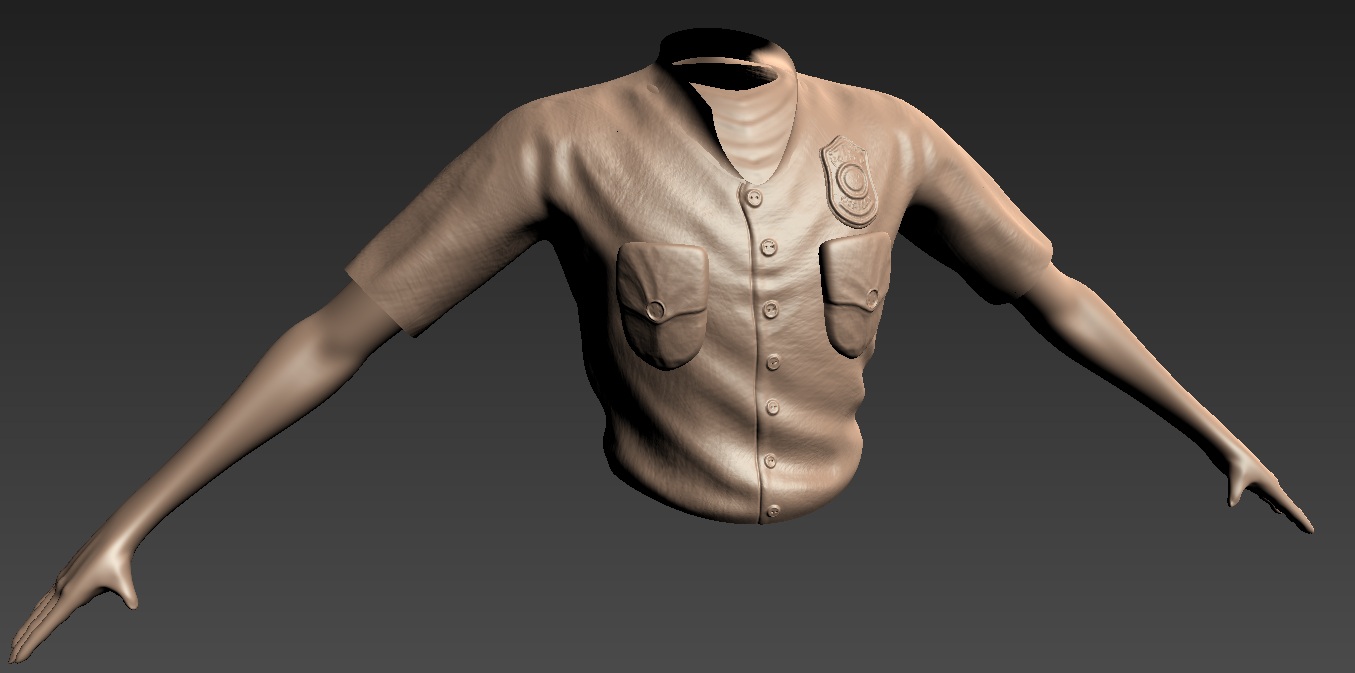

POLICE OFFICER
I did the same process for the Police Officer as I did for the Strong Robber. the Police Officer's head also only needed some UVs moving around, the same goes for the body, no other character needed another unwrapping.

The new UV Map for the Police Officer's head

The AO Map for the Police Officer's head

The Diffuse Map for the Police Officer's head


The new UV Map for the Police Officer's body

The AO Map for the Police Officer's body

The Diffuse for the Police Officer's body


SMALL ROBBER
Last again I did the same process for the Small Robber as I did the Police Officer, with none of the parts needing to be unwrapped again but simply moved around.

Because of the way this model was unwrapped and the seams were simply the neck and mask, like the detective nothing needed doin with the UV Map.

The AO Map for the Small Robber's head

The Diffuse Map for the Small Robber's head

The new UV Map for the Small Robber's body

The AO Map for the Small Robber's body

The Diffuse Map for the Small Robber's body


Mudbox

Now that all of the characters had been unwrapped I was able to import the models into Mudbox where I could scupt in detail on a very high polygon version of the model.

DETECTIVE
I imported my Detecive model into Mudbox first and started scultping in the detail

I started by sculpting the head, the hair wasn't imported as it didn't need any scultping, it would instead be imported later. When sculpting the detective's head I wanted to add age yet healthy and strong

Next I sculpted the body, showing some of the chest muscle through the shirt

I then did the jacket

Here is the finished sculpted high poly model of the Detective

STRONG ROBBER
Now I imported the Strong Robber and began sculpting him

I began with the head and also gave the Strong Robber age by adding wrinkles, I added a scar to his left cheek and also stubble where his facial hair will be

I then sculpted the afro, this was fairly easy and only required a stamp and a lot of polygons

After the head I moved onto the body, sculpting the hands and jacket. I added a texture effect to the turtle neck to make it look different from the jacket

Next I did the shoes and pants, showing thigh muscle through the tight part of the pants higher up

This is the finished high poly Strong Robber


POLICE OFFICER

Next up I began the sculpting for the Police Officer

The Police Officer is younger than the previous characters so he isn't as aged, I added skin pores and creases to the neck. I gave the glasses screws and texture to the hat and badge. The head was also given hair in this stage

I added more shape to the arms, creases and buttons to the shirt and pockets as well as detail to the badge

Here I added laces to the shoes and added a belt & buckle

Here is the finished Police Officer high poly

SMALL ROBBER
Lastly the Small Robber was all that was left to be sculpted

I added texture and detail to the mask, with creases that show an agry expression. The skin also had pores added

Next I added buttons and texture to the shirt, along with creases to the shirt and gloves. The necklace was also detailed and the chest

I added textures and stiching effects to the jeans, also giving lost of creases in folded areas similar to that expected of jeans. The belt was then detailed and the shoes

This is the finished high poly Small Robber